
11.2.3 Face Detection#
- Duration:
35-40 minutes
- Level:
Intermediate
- Prerequisites:
Module 3.3.5 (Delaunay Triangulation)
Overview#
Face detection is one of the most compelling applications of computer vision, enabling creative interactions between humans and digital systems. In this exercise, you will use MediaPipe’s Face Mesh to detect 478 facial landmarks and transform them into striking low-poly portrait art using Delaunay triangulation.
This exercise connects directly to Module 3.3.5 Delaunay Triangulation, applying those geometric concepts to a new creative context. By combining face detection with triangulation, you will create a pipeline that transforms any face photograph into stylized geometric art, demonstrating how foundational algorithms transfer to advanced applications.
Learning Objectives#
By the end of this exercise, you will be able to:
Distinguish between face detection (locating faces) and face recognition (identifying who)
Use MediaPipe Face Mesh to detect 478 facial landmarks in real-time
Apply Delaunay triangulation to facial landmarks for low-poly art generation
Create interactive face-driven generative effects using webcam input
Quick Start: See It In Action#
Run this code to transform a face photo into low-poly art:
 1import cv2
 2import numpy as np
 3from scipy.spatial import Delaunay
 4import mediapipe as mp
 5from mediapipe.tasks import python
 6from mediapipe.tasks.python import vision
 7
 8# Load image and detect face landmarks
 9image = cv2.cvtColor(cv2.imread("sample_face.jpg"), cv2.COLOR_BGR2RGB)
10mp_image = mp.Image(image_format=mp.ImageFormat.SRGB, data=image)
11detector = vision.FaceLandmarker.create_from_options(
12    vision.FaceLandmarkerOptions(base_options=python.BaseOptions(
13        model_asset_path="face_landmarker.task"), num_faces=1))
14landmarks = np.array([[lm.x * image.shape[1], lm.y * image.shape[0]]
15                      for lm in detector.detect(mp_image).face_landmarks[0]])
16
17# Triangulate and render
18tri = Delaunay(landmarks)
19output = np.zeros_like(image)
20for simplex in tri.simplices:
21    pts = landmarks[simplex].astype(np.int32)
22    centroid = pts.mean(axis=0).astype(int)
23    color = image[centroid[1], centroid[0]].tolist()
24    cv2.fillPoly(output, [pts], color)
The pipeline follows three key steps: detect facial landmarks, triangulate the points, and fill each triangle with sampled colors from the original image. The result is a geometric abstraction that preserves the essential features of the face while creating a distinctive artistic effect.
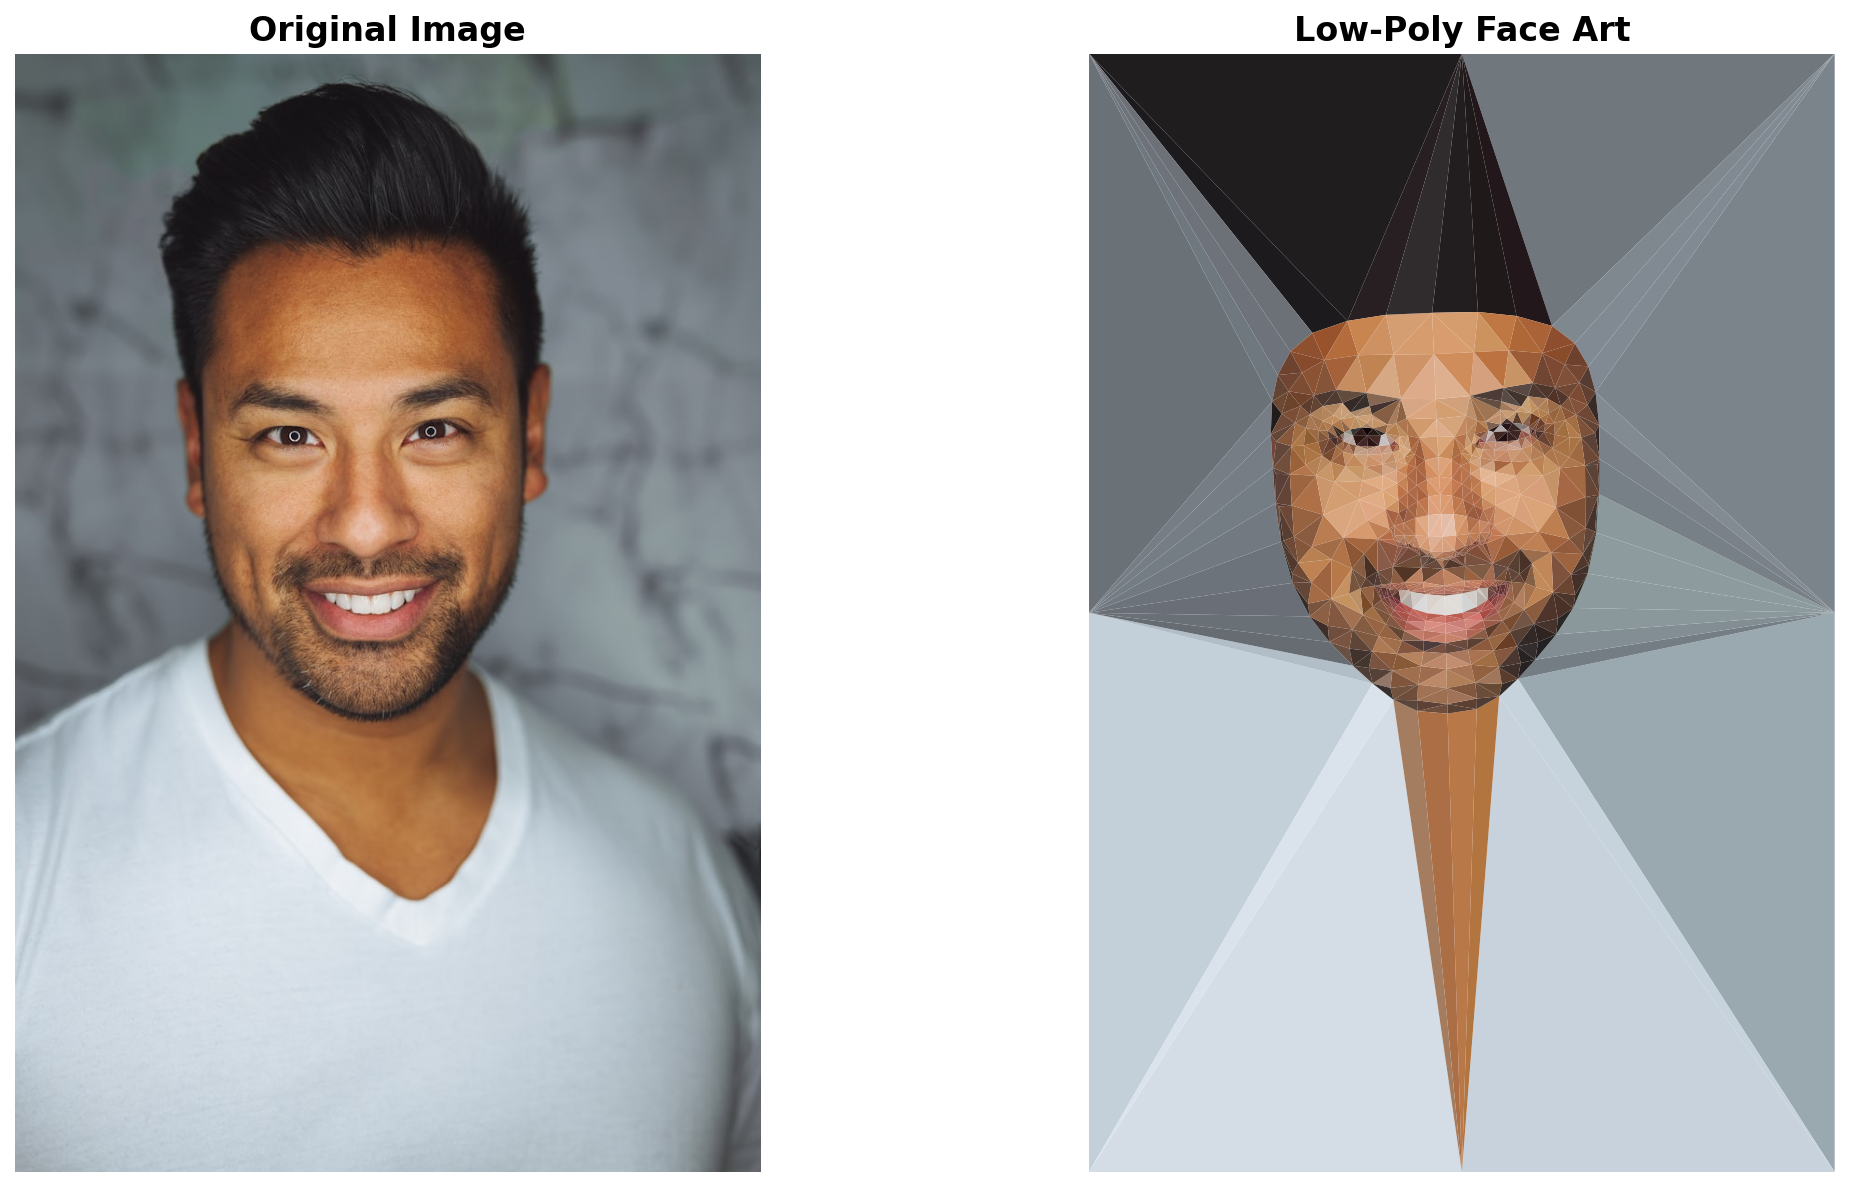
Original portrait transformed into low-poly art using 478 facial landmarks and Delaunay triangulation.#
Note
The sample face image used in this exercise is from Unsplash (CC0 license). Download: https://images.unsplash.com/photo-1507003211169-0a1dd7228f2d?w=800&q=80
Core Concepts#
Concept 1: Face Detection vs. Face Recognition#
Face detection and face recognition are often confused, but they serve fundamentally different purposes [ViolaJones2004]:
Face Detection: Locates faces in an image and provides their bounding boxes or landmark positions. It answers “Where are the faces?” without identifying who they belong to.
Face Recognition: Identifies specific individuals by comparing detected faces against a database. It answers “Who is this person?”
This exercise focuses exclusively on face detection, specifically using facial landmark detection to find 478 precise points on a face. These landmarks enable creative applications without any identification or privacy concerns.
The evolution of face detection algorithms reflects decades of computer vision research:
1990s-2000s: Haar Cascade classifiers using hand-crafted features [ViolaJones2004]
2010s: Deep neural network approaches with improved accuracy
2020s: MediaPipe and similar frameworks enabling real-time detection on mobile devices [MediaPipe2019] [BlazeFace2019]
Did You Know?
The Viola-Jones algorithm (2001) was revolutionary because it could detect faces at 15 frames per second on a 700 MHz processor, using a cascade of simple classifiers to quickly reject non-face regions [ViolaJones2004]. This was the technology behind early digital cameras’ face detection features.
Concept 2: The MediaPipe Face Mesh#
MediaPipe Face Mesh provides 478 three-dimensional landmarks covering the entire face surface [MediaPipe2019]. Unlike simple bounding box detection, these landmarks capture detailed facial geometry including:
Face Oval: 36 points defining the jawline and face contour
Eyes: 128 points covering eyelids, corners, and surrounding area
Eyebrows: 44 points for each eyebrow’s shape
Nose: 40 points from bridge to nostrils
Lips: 40 points for inner and outer lip contours
Irises: 10 points (5 per eye) for precise eye tracking
Face Surface: 180 additional points covering cheeks and forehead
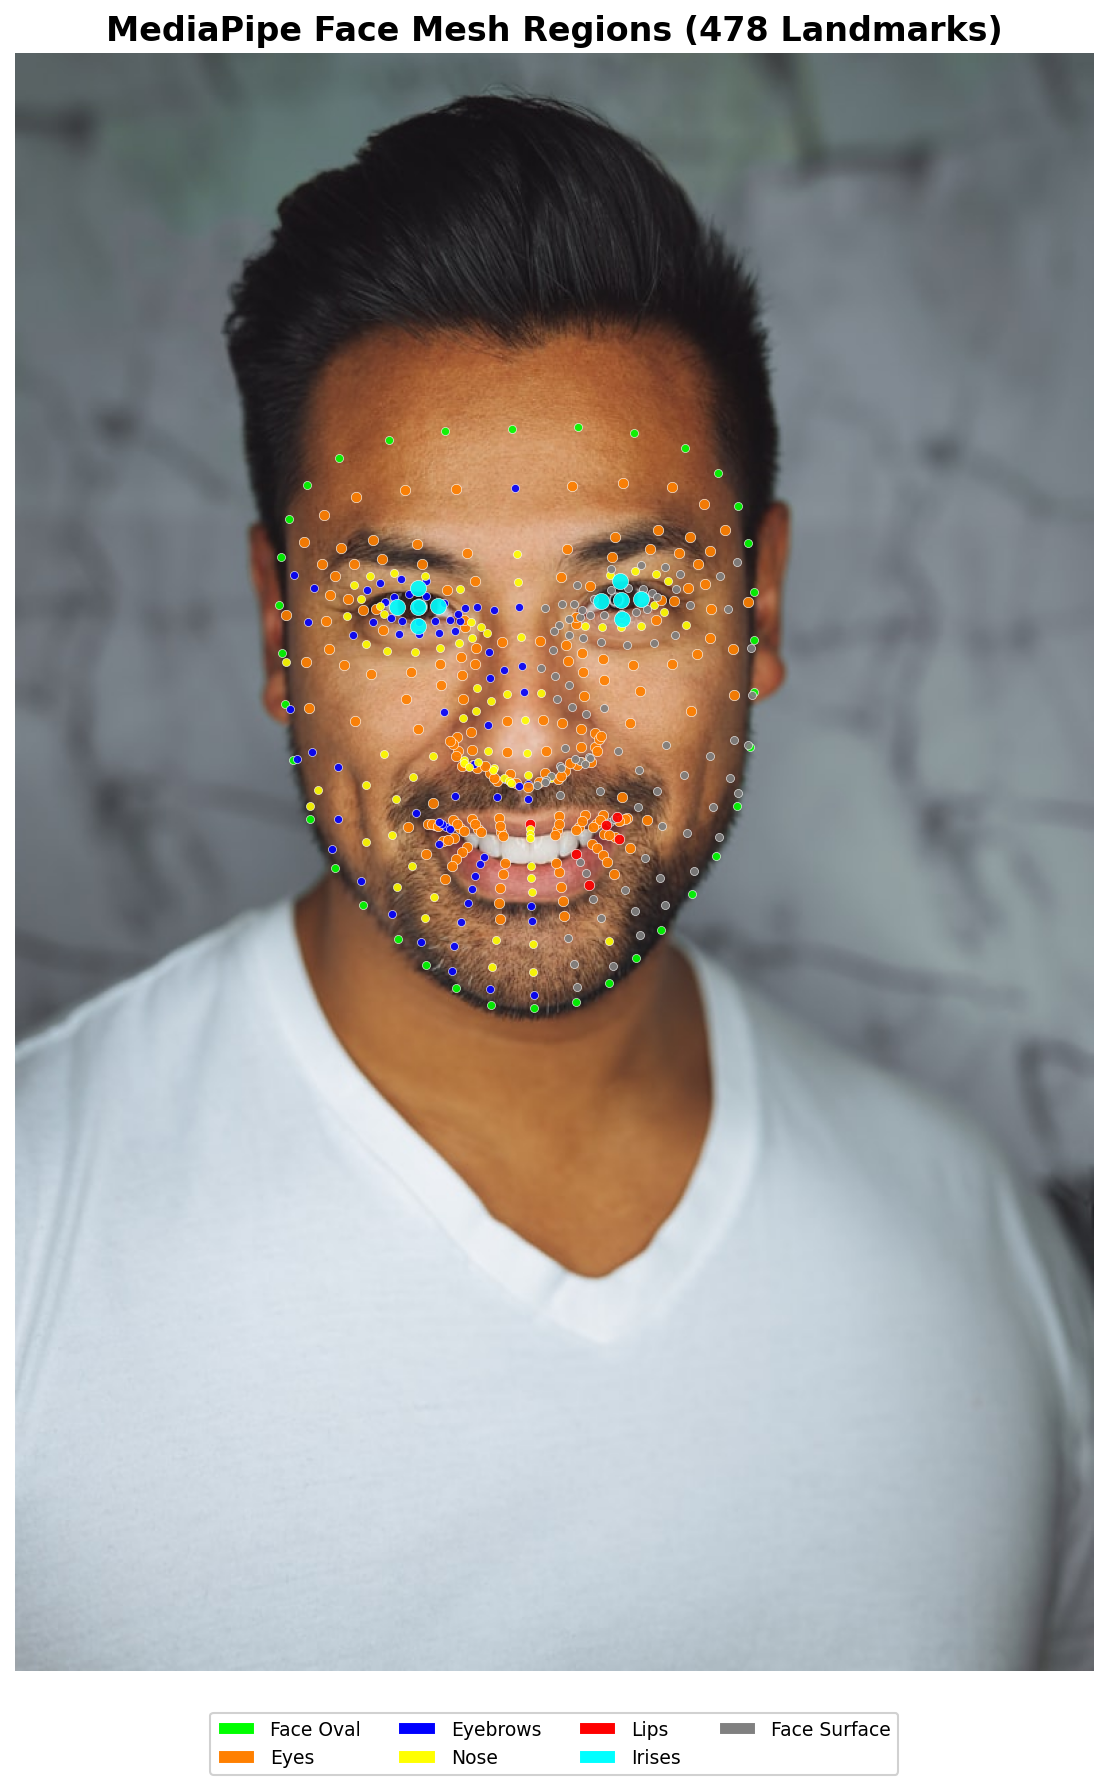
MediaPipe Face Mesh regions. Each color represents a different facial feature group, with 478 total landmarks providing detailed surface coverage. Diagram generated with Claude - Opus 4.5.#
The MediaPipe Tasks API [MediaPipeDocs] provides a simple interface for detection:
 1import mediapipe as mp
 2from mediapipe.tasks import python
 3from mediapipe.tasks.python import vision
 4
 5# Configure and create detector
 6base_options = python.BaseOptions(model_asset_path="face_landmarker.task")
 7options = vision.FaceLandmarkerOptions(
 8    base_options=base_options,
 9    num_faces=1  # Detect up to 1 face
10)
11detector = vision.FaceLandmarker.create_from_options(options)
12
13# Detect landmarks in an image
14mp_image = mp.Image(image_format=mp.ImageFormat.SRGB, data=image_rgb)
15result = detector.detect(mp_image)
16
17# Extract pixel coordinates
18height, width = image_rgb.shape[:2]
19landmarks = []
20for lm in result.face_landmarks[0]:
21    x = lm.x * width   # Convert normalized (0-1) to pixels
22    y = lm.y * height
23    landmarks.append((x, y))
Each landmark has normalized coordinates between 0 and 1, which must be multiplied by the image dimensions to get pixel positions.
Concept 3: From Landmarks to Low-Poly Art#
The connection between face detection and geometric art lies in Delaunay triangulation [Delaunay1934], covered in Module 3.3.5. Facial landmarks provide semantically meaningful points that, when triangulated, create a mesh that follows facial features naturally.
The low-poly pipeline consists of four stages:
Stage 1: Detect Landmarks
MediaPipe provides 478 points distributed according to facial anatomy. Unlike random point placement, these points cluster around important features (eyes, nose, mouth) while remaining sparse on flat areas (cheeks, forehead).
Stage 2: Add Boundary Points
To ensure the triangulation covers the entire image (not just the face), add corner and edge points:
corners = np.array([
    [0, 0], [width, 0], [width, height], [0, height],
    [width/2, 0], [width, height/2], [width/2, height], [0, height/2]
])
all_points = np.vstack([landmarks, corners])
Stage 3: Triangulate
Apply Delaunay triangulation [SciPyDocs] to connect all points into non-overlapping triangles:
from scipy.spatial import Delaunay
triangulation = Delaunay(all_points)
Stage 4: Sample and Render
For each triangle, sample the color at its centroid and fill with that solid color using OpenCV [OpenCVDocs]:
for simplex in triangulation.simplices:
    triangle = all_points[simplex].astype(np.int32)
    centroid = np.mean(triangle, axis=0).astype(int)
    color = image[centroid[1], centroid[0]]  # Sample at centroid
    cv2.fillPoly(output, [triangle], color.tolist())
The result is a geometric abstraction where facial features remain recognizable because the triangle density is highest around eyes, nose, and mouth, exactly where humans focus their attention.
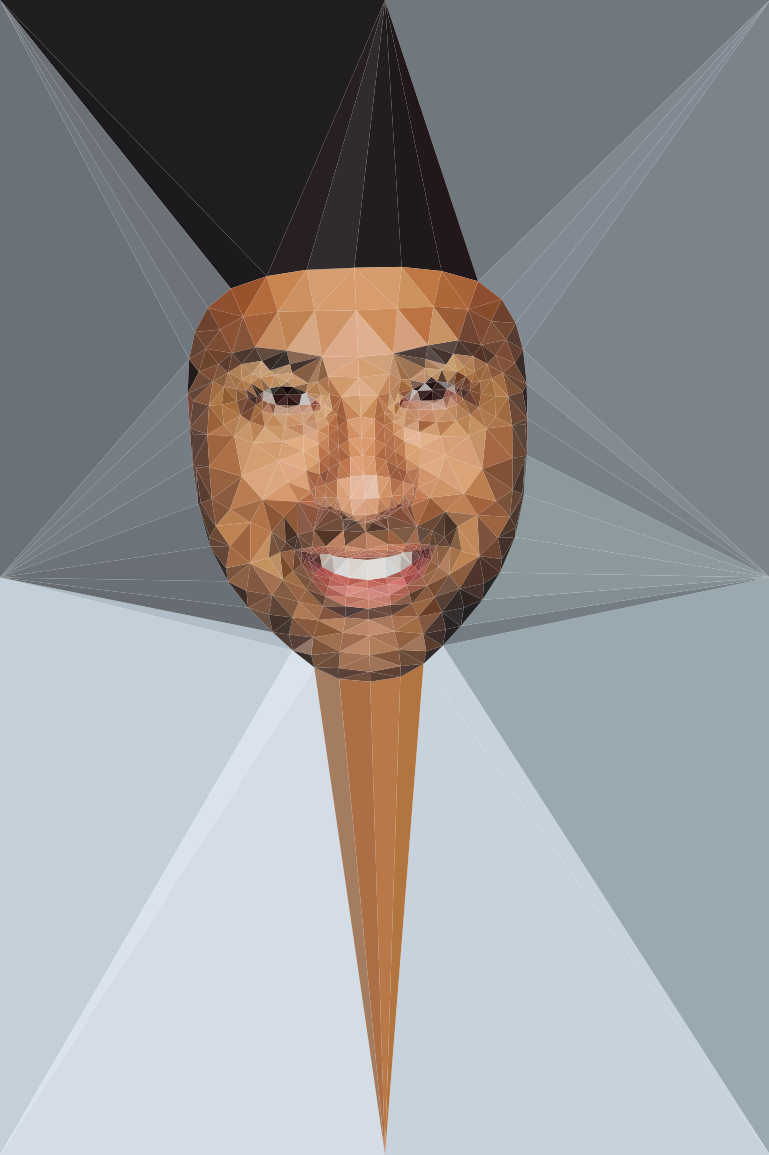
Low-poly face art generated from 478 landmarks plus 8 boundary points, creating approximately 960 triangles.#
Hands-On Exercises#
Exercise 1: Execute and Explore#
Run the basic face detection script to visualize all 478 landmarks:
Download face_detection_basic.py
python face_detection_basic.py
The script detects facial landmarks and draws them with color-coded regions:
Green: Face oval (jawline)
Blue: Eyebrows
Orange: Eyes
Yellow: Nose
Red: Lips
Cyan: Irises
Gray: Face surface (cheeks, forehead)

All 478 MediaPipe landmarks visualized with color-coded regions. Notice the higher density around eyes and lips.#
After running the code, answer these reflection questions:
How many total landmarks does MediaPipe detect on a face?
Which facial features have the highest landmark density?
What happens when no face is detected in the image?
Answers and Explanation
478 landmarks: MediaPipe Face Mesh detects 478 3D landmarks (x, y, z coordinates, though we primarily use x and y).
Highest density regions: Eyes and lips have the most landmarks because these features carry the most expressive information. The mouth area has approximately 40 landmarks for detailed lip tracking.
No face detected: The
result.face_landmarkslist will be empty. Always checkif result.face_landmarks:before accessing landmarks to avoid index errors.
Exercise 2: Modify Parameters#
Experiment with the face landmark visualization by modifying these aspects.
Goal 1: Filter landmarks to show only specific regions
Modify the visualization to show only eye landmarks (indices 33-133 and 263-364):
for idx, landmark in enumerate(face_landmarks):
    # Only draw eye landmarks
    if (33 <= idx <= 133) or (263 <= idx <= 364):
        x = int(landmark.x * width)
        y = int(landmark.y * height)
        cv2.circle(annotated_image, (x, y), 3, (255, 128, 0), -1)
Goal 2: Change the landmark visualization style
Instead of colored circles, draw connected lines between landmarks:
# Draw connections between consecutive landmarks
points = [(int(lm.x * width), int(lm.y * height)) for lm in face_landmarks]
for i in range(len(points) - 1):
    cv2.line(annotated_image, points[i], points[i+1], (0, 255, 0), 1)
Goal 3: Visualize landmark indices
Add text labels showing landmark numbers (useful for understanding the mesh topology):
key_indices = [1, 33, 133, 362, 263, 13, 14, 152]  # Nose, eyes, lips, chin
for idx in key_indices:
    lm = face_landmarks[idx]
    x, y = int(lm.x * width), int(lm.y * height)
    cv2.putText(annotated_image, str(idx), (x, y),
                cv2.FONT_HERSHEY_SIMPLEX, 0.4, (255, 255, 255), 1)
Exercise 3: Create Low-Poly Face Art#
Build the complete low-poly face transformation by completing the starter code below.
Requirements:
Load an image and detect facial landmarks
Apply Delaunay triangulation to the landmark points
Add boundary points for full canvas coverage
Sample colors from the original image at triangle centroids
Render the result as filled triangles
Hint 1: Creating the detector
base_options = python.BaseOptions(model_asset_path="face_landmarker.task")
options = vision.FaceLandmarkerOptions(base_options=base_options, num_faces=1)
detector = vision.FaceLandmarker.create_from_options(options)
result = detector.detect(mp_image)
Hint 2: Extracting landmarks
landmarks = []
for lm in result.face_landmarks[0]:
    x = lm.x * width
    y = lm.y * height
    landmarks.append([x, y])
landmarks = np.array(landmarks)
Complete Solution
See the complete implementation in lowpoly_face.py.
 1import cv2
 2import numpy as np
 3from scipy.spatial import Delaunay
 4import mediapipe as mp
 5from mediapipe.tasks import python
 6from mediapipe.tasks.python import vision
 7
 8# Load image
 9image_bgr = cv2.imread("sample_face.jpg")
10image_rgb = cv2.cvtColor(image_bgr, cv2.COLOR_BGR2RGB)
11height, width = image_rgb.shape[:2]
12
13# Create detector
14base_options = python.BaseOptions(model_asset_path="face_landmarker.task")
15options = vision.FaceLandmarkerOptions(base_options=base_options, num_faces=1)
16detector = vision.FaceLandmarker.create_from_options(options)
17
18# Detect landmarks
19mp_image = mp.Image(image_format=mp.ImageFormat.SRGB, data=image_rgb)
20result = detector.detect(mp_image)
21
22# Extract landmark coordinates
23landmarks = np.array([[lm.x * width, lm.y * height]
24                      for lm in result.face_landmarks[0]])
25
26# Add boundary points
27corners = np.array([
28    [0, 0], [width, 0], [width, height], [0, height],
29    [width/2, 0], [width, height/2], [width/2, height], [0, height/2]
30])
31all_points = np.vstack([landmarks, corners])
32
33# Triangulate
34triangulation = Delaunay(all_points)
35
36# Render
37output = np.zeros_like(image_rgb)
38for simplex in triangulation.simplices:
39    triangle = all_points[simplex].astype(np.int32)
40    centroid = np.mean(triangle, axis=0).astype(int)
41    cx = np.clip(centroid[0], 0, width - 1)
42    cy = np.clip(centroid[1], 0, height - 1)
43    color = image_rgb[cy, cx].tolist()
44    cv2.fillPoly(output, [triangle], color)
45
46cv2.imwrite("my_lowpoly_face.png", cv2.cvtColor(output, cv2.COLOR_RGB2BGR))
47detector.close()
Challenge Extension: Add white edge lines to create a “stained glass” effect:
# After filling all triangles, draw edges
for simplex in triangulation.simplices:
    triangle = all_points[simplex].astype(np.int32)
    cv2.polylines(output, [triangle], True, (255, 255, 255), 1)
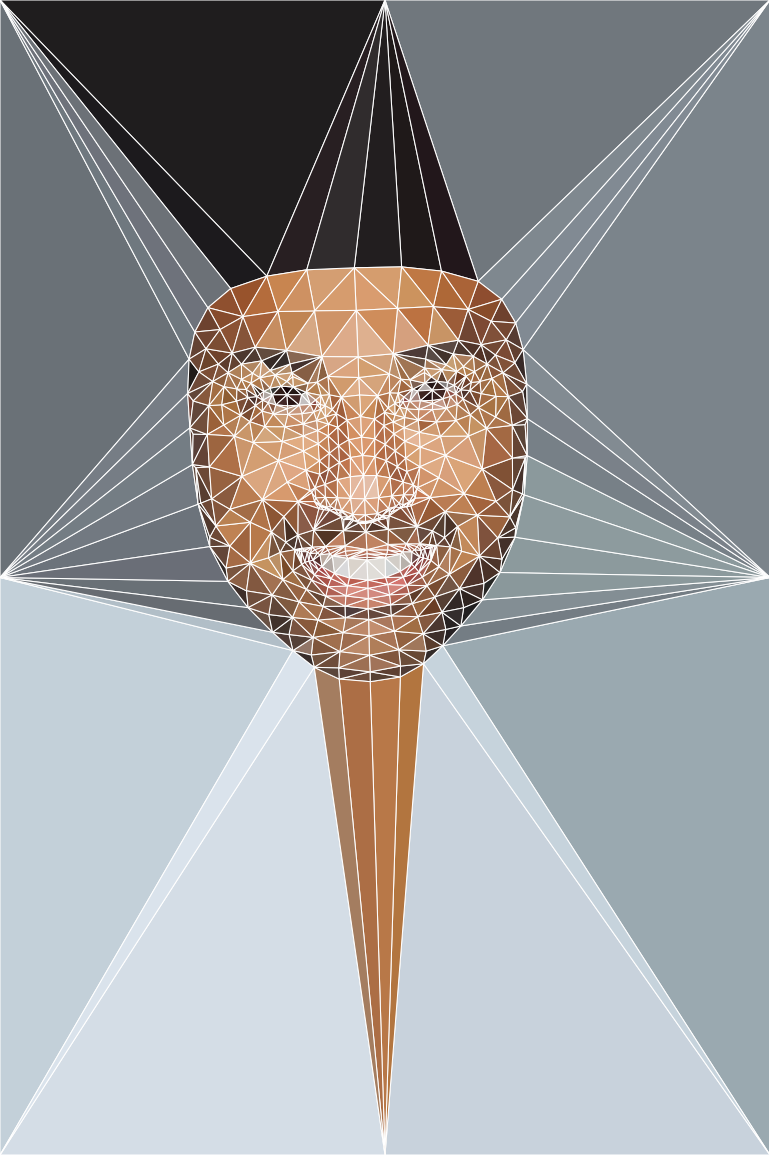
Low-poly face with visible edges, creating a stained glass aesthetic.#
Exercise 4: Real-Time Webcam Low-Poly Face#
Transform your live webcam feed into real-time low-poly art.
Run the real-time script:
python realtime_lowpoly.py
Controls:
Q: Quit the application
S: Save the current frame as an image
E: Toggle edge visibility
F: Toggle FPS display
The script applies the same low-poly pipeline to each video frame, processing at approximately 15-30 FPS depending on your hardware. Key adaptations for real-time processing include:
Video Mode: MediaPipe uses
RunningMode.VIDEOfor temporal consistencyTimestamp Handling: Each frame requires a monotonically increasing timestamp
Efficient Rendering: OpenCV’s
fillPolyis faster than matplotlib for real-time use
 1# Configure for video mode (not static images)
 2options = vision.FaceLandmarkerOptions(
 3    base_options=base_options,
 4    running_mode=vision.RunningMode.VIDEO,  # Important!
 5    num_faces=1
 6)
 7
 8# Each frame needs a timestamp (milliseconds)
 9timestamp_ms = int(time.time() * 1000)
10result = detector.detect_for_video(mp_image, timestamp_ms)
Challenge: Modify the real-time script to support multiple faces by changing num_faces=1 to num_faces=3 and iterating over all detected faces.
TouchDesigner Extension (Optional)#
- Duration:
+20 minutes (optional)
For those with TouchDesigner experience, this extension demonstrates how the NumPy-based face detection concepts translate directly to real-time performance applications.
Note
Requirements:
TouchDesigner 2022.20000 or later (tested on 2025.31310)
Python 3.11 with
scipyinstalledMediaPipe TouchDesigner Plugin
Download the complete project:
Download TouchDesigner Project
Output Examples:
Step 1: Environment Setup
TouchDesigner requires external Python packages to be installed separately and configured in preferences.
Quick Setup:
Install Python 3.11 (must match TouchDesigner’s Python version)
Install scipy:
pip install scipy numpyIn TouchDesigner: Edit > Preferences > Python 64 bit Module Path
Set path to your Python site-packages folder
Verify installation by creating a Text DAT and running:
import scipy
print(scipy.__version__)
For detailed setup instructions, see the TouchDesigner Python Documentation.
Step 2: MediaPipe Face Tracking Setup
Download and set up the MediaPipe plugin:
Download from GitHub: torinmb/mediapipe-touchdesigner
Drag
MediaPipe.toxinto your projectDrag
face_tracking.toxinto your projectConnect your webcam to the MediaPipe component
Network structure:
Video Device In TOP --> MediaPipe --> face_tracking
The face_tracking component outputs a SOP with 478 face landmark points.
Step 3: Create Delaunay Script SOP
Create a Script SOP to triangulate the face landmarks:
Press Tab > type “Script” > add Script SOP
Connect the face_tracking SOP output to the Script SOP input
In the Script SOP’s callback DAT, paste this code:
 1import numpy as np
 2import scipy.spatial as sc
 3
 4def cook(scriptOp):
 5    scriptOp.clear()
 6
 7    # Get input points (face landmarks)
 8    input_sop = scriptOp.inputs[0]
 9    if input_sop is None or len(input_sop.points) < 3:
10        return
11
12    # Extract 2D points for Delaunay triangulation
13    points = [[p.x, p.y] for p in input_sop.points]
14
15    # Compute Delaunay triangulation
16    tri = sc.Delaunay(points)
17
18    # Create triangular polygons
19    for ia, ib, ic in tri.simplices:
20        poly = scriptOp.appendPoly(3, closed=True)
21        for idx, pt_idx in enumerate([ia, ib, ic]):
22            p = input_sop.points[pt_idx]
23            poly[idx].point.P = (p.x, p.y, p.z)
Key concepts:
Line 11: Extract only X and Y for 2D triangulation
Line 14:
scipy.spatial.Delaunaycomputes the triangulationLines 17-21: Create polygons using the triangle indices
Step 4: Render the Triangulated Mesh
Set up the rendering pipeline to visualize the result:
4.1 Create Geometry COMP:
Press Tab > add Geometry COMP
Double-click to go inside, delete the default
torus1Add an In SOP inside
Press U to go back up
Connect
script1output togeo1input
4.2 Add Wireframe Material:
Press Tab > add Wireframe MAT
In
geo1parameters > Render tab > Material: set towireframe1
4.3 Create Camera and Render:
Add Camera COMP (orthographic recommended for 2D face overlay)
Add Render TOP
In Render TOP: set Camera to
camera1, Geometry togeo1
4.4 Composite over Webcam:
Add Composite TOP
Connect webcam feed (from MediaPipe) to input 0
Connect Render TOP to input 1
Set Operation to “Over” or “Add”
Final network:
MediaPipe --> face_tracking --> script1 --> geo1 --> render1 --> composite1
    |                                         ^           ^
    |                                     camera1     [webcam]
    +-------------------------------------------------->
Step 5: Artistic Enhancements (Optional)
Adding Noise for Organic Movement:
Add a Noise SOP after the Script SOP to create organic, flowing distortion:
Press Tab > add Noise SOP
Connect
script1output tonoise1inputConnect
noise1output togeo1input (instead of script1)
Recommended Noise Parameters:
Type: Sparse
Amplitude: 0.02 - 0.05 (subtle movement)
Period: 2 - 4
Roughness: 0.5
Translate Z: Use an LFO or
absTime.seconds * 0.5for animation
The noise creates a subtle organic ripple effect across the triangulated mesh, making the visualization feel more alive and dynamic.
Neon Glow Effect:
Add Bloom TOP after the Render TOP
Increase Size and Threshold parameters
Use a bright wireframe color (cyan, magenta, or white)
Audio Reactivity (Advanced):
Add Audio Device In CHOP
Use Analyze CHOP to extract amplitude
Drive wireframe thickness or noise intensity with audio levels
This extension demonstrates how creative coding concepts transfer from Python prototyping to real-time interactive installations.
Summary#
Key Takeaways#
Face detection locates faces without identifying who they belong to; face recognition identifies individuals
MediaPipe Face Mesh provides 478 3D landmarks covering the entire face surface in real-time
Delaunay triangulation applied to facial landmarks creates low-poly art that preserves facial features
Color sampling at centroids produces the characteristic flat-shaded geometric look
The technique transfers directly from still images to real-time video with minor API changes
Common Pitfalls#
BGR vs RGB: OpenCV loads images as BGR, but MediaPipe expects RGB. Always convert with
cv2.cvtColor(image, cv2.COLOR_BGR2RGB)Normalized coordinates: MediaPipe landmarks are 0-1 normalized. Multiply by image width/height to get pixels
Empty results: Always check
if result.face_landmarks:before accessing landmarksCentroid bounds: When sampling colors, clip centroid coordinates to valid image bounds to avoid index errors
Video timestamps: In video mode, timestamps must be monotonically increasing (never go backward)
References#
Viola, P., & Jones, M. J. (2004). Robust Real-Time Face Detection. International Journal of Computer Vision, 57(2), 137-154. https://doi.org/10.1023/B:VISI.0000013087.49260.fb
Lugaresi, C., Tang, J., Nash, H., McClanahan, C., Uboweja, E., Hays, M., … & Grundmann, M. (2019). MediaPipe: A Framework for Building Perception Pipelines. arXiv preprint. https://arxiv.org/abs/1906.08172
Bazarevsky, V., Kartynnik, Y., Vakunov, A., Raveendran, K., & Grundmann, M. (2019). BlazeFace: Sub-millisecond Neural Face Detection on Mobile GPUs. arXiv preprint. https://arxiv.org/abs/1907.05047
Delaunay, B. (1934). Sur la sphere vide. Bulletin de l’Academie des Sciences de l’URSS, 6, 793-800.
Google. (2024). Face Landmarker guide for Python. Google AI Edge. https://ai.google.dev/edge/mediapipe/solutions/vision/face_landmarker/python
OpenCV Developers. (2024). OpenCV Python Tutorials. OpenCV Documentation. https://docs.opencv.org/4.x/d6/d00/tutorial_py_root.html
SciPy Developers. (2024). scipy.spatial.Delaunay. SciPy Documentation. https://docs.scipy.org/doc/scipy/reference/generated/scipy.spatial.Delaunay.html
Blankensmith, T. (2024). MediaPipe TouchDesigner Plugin. GitHub. torinmb/mediapipe-touchdesigner