3.1.1 - Rotation#
- Duration:
20 minutes
- Level:
Beginner
Overview#
Rotation is one of the fundamental geometric transformations in image processing and generative art. In this exercise, you will discover how to rotate images and shapes using NumPy arrays and the SciPy library. By understanding rotation, you unlock the ability to create dynamic compositions, radial patterns, and animations that bring static images to life.
Learning Objectives
By the end of this exercise, you will be able to:
Rotate images and shapes by any angle using
scipy.ndimage.rotate()Understand how the center of rotation affects the transformation result
Apply interpolation concepts to handle pixel resampling during rotation
Create artistic patterns by combining multiple rotated copies of a shape
Quick Start#
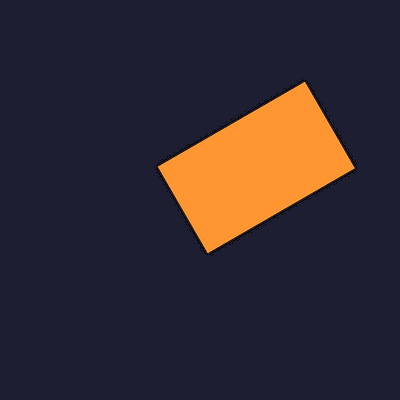
Let us begin by seeing rotation in action. Run the following code to create a simple shape and rotate it by 45 degrees:
 1import numpy as np
 2from scipy import ndimage
 3from PIL import Image
 4
 5# Step 1: Create a simple colored rectangle on a dark background
 6canvas_size = 400
 7image = np.zeros((canvas_size, canvas_size, 3), dtype=np.uint8)
 8
 9# Draw a cyan rectangle in the center
10rect_top, rect_bottom = 150, 250
11rect_left, rect_right = 100, 300
12image[rect_top:rect_bottom, rect_left:rect_right] = [0, 200, 200]
13
14# Step 2: Rotate the image by 45 degrees
15rotation_angle = 45
16rotated_image = ndimage.rotate(image, rotation_angle, reshape=False, mode='constant', cval=0)
17
18# Step 3: Create side-by-side comparison
19comparison = np.zeros((canvas_size, canvas_size * 2 + 20, 3), dtype=np.uint8)
20comparison[:, :canvas_size] = image
21comparison[:, canvas_size + 20:] = rotated_image
22
23# Step 4: Save the result
24output = Image.fromarray(comparison, mode='RGB')
25output.save('simple_rotation.png')

Left: Original rectangle. Right: The same rectangle rotated 45 degrees around the image center.#
Notice how the rectangle appears tilted in the rotated version. The rotation happens around the center of the image, and pixels that would fall outside the canvas boundaries are clipped.
Core Concepts#
Understanding Image Rotation#
When we rotate an image, each pixel moves to a new location based on a mathematical transformation. The rotation preserves the distances between pixels (it is a rigid transformation) but changes their angular positions relative to a center point.
The key parameters that control rotation are:
Angle: How many degrees to rotate (positive = counter-clockwise)
Center: The pivot point around which rotation occurs
Interpolation: How to handle pixels that land between grid positions
Output size: Whether to expand the canvas to fit the rotated content
Important
In NumPy and SciPy, positive angles rotate counter-clockwise, following the mathematical convention. This matches the behavior you learned in Module 2 with coordinate systems.
The Rotation Matrix#
Behind the scenes, rotation is performed using a 2D rotation matrix. For an angle \(\theta\), the rotation matrix is:
Each pixel at position \((x, y)\) is transformed to a new position
\((x', y')\) by multiplying with this matrix. You do not need to implement
this yourself - scipy.ndimage.rotate() handles it automatically.
Did You Know?
The rotation matrix is an example of an orthogonal matrix, meaning its inverse equals its transpose. This mathematical property ensures that rotations preserve lengths and angles - your shapes will not become distorted when rotated [Gonzalez2018].
Center of Rotation and Interpolation#
The center of rotation (pivot point) determines where the rotation occurs.
By default, scipy.ndimage.rotate() uses the image center as the pivot.
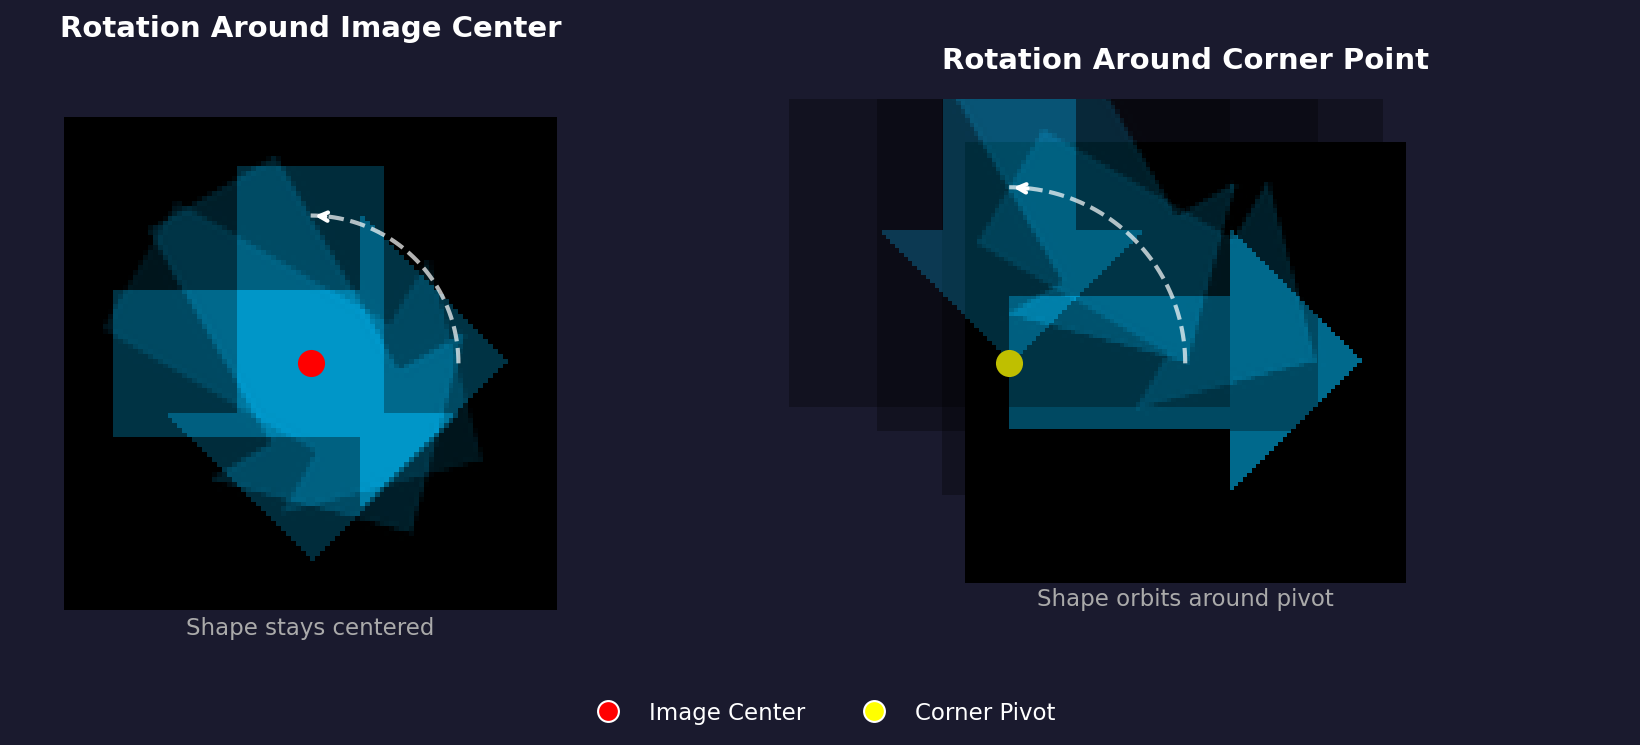
Left: Rotation around the image center keeps the shape in place. Right: Rotation around a corner causes the shape to orbit around the pivot. Diagram generated with Claude - Opus 4.5.#
When pixels are rotated to non-integer positions (which happens for most angles),
interpolation is used to compute the new pixel values. The order
parameter controls interpolation quality:
order=0: Nearest neighbor (fast but blocky)order=1: Bilinear interpolation (default, good balance)order=3: Cubic interpolation (smoother but slower)
The reshape parameter is also important:
reshape=True: Expands output to contain all rotated pixels (may change image size)reshape=False: Keeps original size (clips pixels that fall outside)
# Reshape=False: same size output, content may be clipped
rotated_clip = ndimage.rotate(image, 45, reshape=False)
print(rotated_clip.shape)  # Same as original

# Reshape=True: larger output to fit all content
rotated_full = ndimage.rotate(image, 45, reshape=True)
print(rotated_full.shape)  # Larger than original
Hands-On Exercises#
Exercise 1: Execute and Explore#
Download rotation_pattern.py and run it to see how multiple rotations create generative art:
python rotation_pattern.py
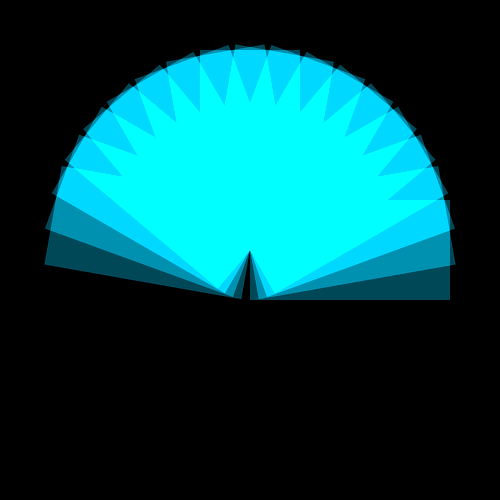
A fan-like pattern created by rotating a rectangle 18 times and overlaying the results with additive blending.#
Reflection Questions
Question 1
What visual effect is created when the rotated shapes overlap?
Answer
The overlapping regions become brighter due to additive blending. Each rotation adds its color values to the canvas, so areas where multiple rotations overlap accumulate higher values (up to 255).
Question 2
How does the number of rotations affect the pattern density?
Answer
More rotations create a denser, more filled pattern. With 18 rotations spread across 180 degrees, each step is 10 degrees apart. Using 36 rotations would make it 5 degrees apart, creating a smoother fan.
Question 3
Why does the pattern form a circular/radial shape?
Answer
The rotation happens around the image center. Since the rectangle is offset from center, it sweeps a circular arc as it rotates, creating the radial fan pattern.
Exercise 2: Modify Parameters#
Open rotation_pattern.py and make the following modifications:
Goal 1: Change the pattern to use only 6 rotations (more sparse)
Hint
Change number_of_rotations = 18 to number_of_rotations = 6.
This will create wider gaps between each rotated copy.
Goal 2: Create a warm color palette (oranges and reds instead of cyan)
Hint
Find the line where the shape color is set to [0, 180, 220] (cyan)
and change it to [255, 120, 50] for an orange color.
Goal 3: Make the pattern fill a full 360 degrees instead of 180
Hint
Change angle_step = 180 / number_of_rotations to
angle_step = 360 / number_of_rotations to spread rotations
across the full circle.
Complete Solution
 1import numpy as np
 2from scipy import ndimage
 3from PIL import Image
 4
 5canvas_size = 500
 6number_of_rotations = 6  # Changed from 18
 7angle_step = 360 / number_of_rotations  # Changed to full circle
 8
 9canvas = np.zeros((canvas_size, canvas_size, 3), dtype=np.uint8)
10
11shape = np.zeros((canvas_size, canvas_size, 3), dtype=np.uint8)
12rect_top, rect_bottom = 200, 300
13rect_left, rect_right = 250, 450
14shape[rect_top:rect_bottom, rect_left:rect_right] = [255, 120, 50]  # Orange
15
16for i in range(number_of_rotations):
17    rotation_angle = i * angle_step
18    rotated_shape = ndimage.rotate(shape, rotation_angle, reshape=False, mode='constant', cval=0)
19    contribution = (rotated_shape * 0.4).astype(np.uint8)
20    canvas = np.clip(canvas.astype(np.int16) + contribution.astype(np.int16), 0, 255).astype(np.uint8)
21
22output = Image.fromarray(canvas, mode='RGB')
23output.save('modified_pattern.png')

The modified pattern with 6 rotations, orange color, and full 360-degree spread.#
Exercise 3: Build Your Own Rotation Tool#
Create a rotation tool from scratch that rotates a shape onto a colored background. Your tool should:
Create a canvas filled with a background color
Draw a colored shape on a separate layer
Rotate the shape by a specified angle
Composite the rotated shape onto the background
Requirements
Use a dark blue background:
[30, 30, 50]Create an orange rectangle:
[255, 150, 50]Rotate by 30 degrees
Save as
my_rotation.png
Starter Code
Download rotation_starter.py and use it as your starting point. Fill in the TODO sections.
Hint 1: Filling the background
To fill the entire canvas with a background color, use array broadcasting:
canvas[:, :] = background_color
Hint 2: Creating a mask for compositing
After rotating, you need to overlay non-black pixels onto the background. Create a mask that identifies where the rotated shape has color:
mask = np.any(rotated_shape > 0, axis=2)
canvas[mask] = rotated_shape[mask]
Complete Solution
 1canvas_size = 400
 2rotation_angle = 30  # Try different angles: 45, 90, 135, etc.
 3background_color = [30, 30, 50]  # Dark blue background [R, G, B]
 4shape_color = [255, 150, 50]    # Orange shape [R, G, B]
 5
 6# ============================================
 7# Step 1: Create canvas with background color
 8# ============================================
 9# Create a canvas array and fill it with the background color
10canvas = np.zeros((canvas_size, canvas_size, 3), dtype=np.uint8)
11canvas[:, :] = background_color  # Fill entire canvas with background
12
13# ============================================
14# Step 2: Create a shape to rotate
15# ============================================
16# Create a separate layer for the shape (on black background for easy masking)
17shape_layer = np.zeros((canvas_size, canvas_size, 3), dtype=np.uint8)
18
19# Draw a rectangle in the center-right area
20# This offset position will show rotation clearly
21rect_top = 150
22rect_bottom = 250
23rect_left = 180
24rect_right = 350
25
26shape_layer[rect_top:rect_bottom, rect_left:rect_right] = shape_color
27
28# ============================================
29# Step 3: Rotate the shape
30# ============================================
31# Use scipy.ndimage.rotate() to rotate the shape layer
32# reshape=False keeps the output size the same as input
33# mode='constant' fills empty areas with cval (0 = black)
34rotated_shape = ndimage.rotate(
35    shape_layer,
36    rotation_angle,
37    reshape=False,
38    mode='constant',
39    cval=0
40)
41
42# ============================================
43# Step 4: Combine shape with background
44# ============================================
45# Create a mask: where the rotated shape is not black (has color)
46# We check if any channel has value > 0
47mask = np.any(rotated_shape > 0, axis=2)
48
49# Apply the rotated shape to canvas where mask is True
50# This preserves the background where the shape is transparent (black)
51canvas[mask] = rotated_shape[mask]
52
53# ============================================
54# Step 5: Save the result
55# ============================================
56output = Image.fromarray(canvas, mode='RGB')
57output.save('rotation_solution.png')
58
The completed rotation tool output: an orange rectangle rotated 30 degrees on a dark blue background.#
Challenge Extension
Extend your rotation tool to create an animated GIF that shows the shape
rotating through 360 degrees. Use the imageio library to save multiple
frames as an animation.
Summary#
Key Takeaways
Rotation transforms pixel positions around a center point (pivot)
scipy.ndimage.rotate()handles the rotation matrix math automaticallyPositive angles rotate counter-clockwise (mathematical convention)
The
reshapeparameter controls whether output expands to fit contentInterpolation smooths out pixels that land between grid positions
Multiple rotations with blending create artistic radial patterns
Common Pitfalls
Warning
Clipped content: When using reshape=False, parts of your rotated
image may be cut off. Use reshape=True if you need to preserve all
content.
Warning
Jagged edges: For smooth rotation edges, use higher interpolation
orders (order=1 or order=3). The default bilinear interpolation
usually provides a good balance.
Warning
Unexpected center: The rotation always happens around the image center, not the shape center. If your shape is not centered, it will orbit around the image center rather than spinning in place.
References#
Gonzalez, R. C., & Woods, R. E. (2018). Digital Image Processing (4th ed.). Pearson. ISBN: 978-0-13-335672-4. Chapter 2 covers geometric transformations including rotation.
Foley, J. D., van Dam, A., Feiner, S. K., & Hughes, J. F. (1996). Computer Graphics: Principles and Practice (2nd ed.). Addison-Wesley. Chapter 5 provides mathematical foundations for 2D transformations.
SciPy Community. (2024). scipy.ndimage.rotate. SciPy Documentation. https://docs.scipy.org/doc/scipy/reference/generated/scipy.ndimage.rotate.html
Harris, C. R., et al. (2020). Array programming with NumPy. Nature, 585, 357-362. https://doi.org/10.1038/s41586-020-2649-2
Szeliski, R. (2022). Computer Vision: Algorithms and Applications (2nd ed.). Springer. Chapter 2 covers image transformations and warping.
Burger, W., & Burge, M. J. (2016). Digital Image Processing: An Algorithmic Introduction Using Java (2nd ed.). Springer. Chapter 22 discusses geometric operations.
Clark, A., et al. (2024). Pillow (PIL Fork) Documentation. https://pillow.readthedocs.io/