2.1.4 - Creating Star Fields#
- Duration:
20 minutes
- Level:
Beginner
Overview#
This exercise teaches you how to create star fields using NumPy’s integer array indexing. This technique places individual pixels at specific coordinates, making it useful for particle systems and scatter plots.
You will learn how different random distributions affect the visual result. Uniform distribution scatters stars evenly, while Gaussian distribution creates natural-looking clusters.
Learning Objectives:
Use integer array indexing to place individual pixels at arbitrary locations
Generate random point distributions using NumPy’s random functions
Compare uniform vs. Gaussian distributions for different visual effects
Create multi-cluster star fields for galaxy-like patterns
Quick Start#
Let’s create a simple star field. Run this script to see the result:
 1import numpy as np
 2from PIL import Image
 3
 4# Configuration
 5CANVAS_SIZE = 400       # Width and height in pixels
 6NUM_STARS = 150         # Number of stars to place
 7BACKGROUND = 0          # Black background (grayscale value)
 8STAR_BRIGHTNESS = 255   # White stars (grayscale value)
 9
10# Step 1: Create a black canvas (grayscale image)
11canvas = np.full((CANVAS_SIZE, CANVAS_SIZE), BACKGROUND, dtype=np.uint8)
12
13# Step 2: Generate random coordinates for star positions
14# np.random.randint generates integers in range [low, high)
15x_coords = np.random.randint(0, CANVAS_SIZE, size=NUM_STARS)
16y_coords = np.random.randint(0, CANVAS_SIZE, size=NUM_STARS)
17
18# Step 3: Place stars using integer array indexing
19# Note: NumPy uses [row, column] order, which is [y, x] in image coordinates
20canvas[y_coords, x_coords] = STAR_BRIGHTNESS
21
22# Step 4: Save the result
23image = Image.fromarray(canvas, mode='L')  # 'L' for grayscale
24image.save('simple_star.png')
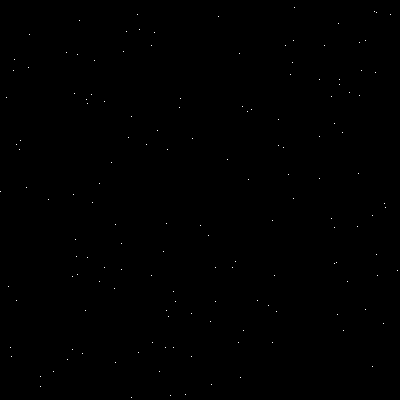
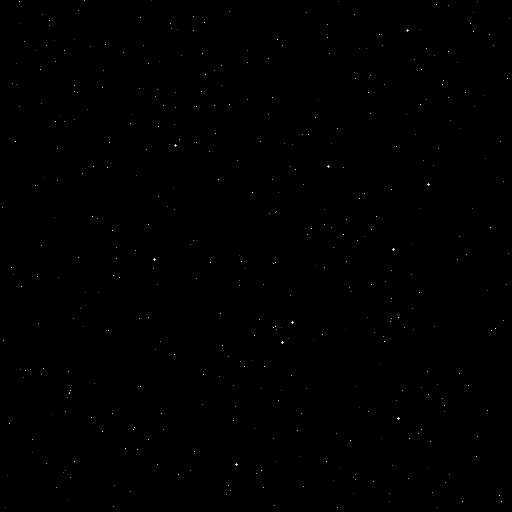
A star field with 150 randomly placed white pixels on a 400x400 black canvas. Each star occupies exactly one pixel.#
Tip
What you just did: You used integer array indexing to place 150 pixels
at once. The key line canvas[y_coords, x_coords] = 255 assigns the
brightness value to every position specified by the coordinate arrays.
This is far more efficient than looping through each star individually.
Core Concepts#
Concept 1: Integer Array Indexing (Fancy Indexing)#
NumPy supports several ways to select and modify array elements. In Module 2.1.3 (Circles), you used boolean masking where a True/False array determines which pixels to modify. Here, we use integer array indexing, where arrays of integers specify the exact row and column positions [Harris2020].
When you write:
canvas[y_coords, x_coords] = value
NumPy interprets this as: “For each pair (y_coords[i], x_coords[i]), set
that pixel to value.” The coordinate arrays must have the same shape.
Important
Row-Column Order: NumPy arrays use [row, column] indexing, which
corresponds to [y, x] in image coordinates. This is the opposite of
mathematical (x, y) notation. Always remember: rows are vertical (y),
columns are horizontal (x).
# To place a pixel at image position (x=100, y=50):
canvas[50, 100] = 255  # [row, column] = [y, x]
The table below compares the three main indexing techniques:
Technique |
When to Use |
Example |
|---|---|---|
Slicing |
Rectangular regions |
|
Boolean Masking |
Shape-based selection (circles, complex regions) |
|
Integer Indexing |
Individual points at arbitrary locations |
|
Concept 2: Random Point Distributions#
The visual appearance of a star field depends heavily on how you generate the random coordinates. NumPy provides several distribution functions [NumPyRandom2024]:
Uniform Distribution (np.random.randint):
Every position is equally likely. Stars are scattered evenly across the canvas with no clustering. This creates a “white noise” pattern.
# Every pixel has equal probability of receiving a star
x = np.random.randint(0, CANVAS_SIZE, size=NUM_STARS)
y = np.random.randint(0, CANVAS_SIZE, size=NUM_STARS)
Gaussian (Normal) Distribution (np.random.normal):
Points cluster around a center point with a bell-curve falloff. The spread
parameter (standard deviation) controls how tightly stars cluster [Ross2014].
# Stars cluster around (CENTER_X, CENTER_Y) with spread=60
x = np.random.normal(CENTER_X, spread, size=NUM_STARS)
y = np.random.normal(CENTER_Y, spread, size=NUM_STARS)

# Clip to canvas bounds (Gaussian can produce out-of-range values)
x = np.clip(x, 0, CANVAS_SIZE - 1).astype(int)
y = np.clip(y, 0, CANVAS_SIZE - 1).astype(int)
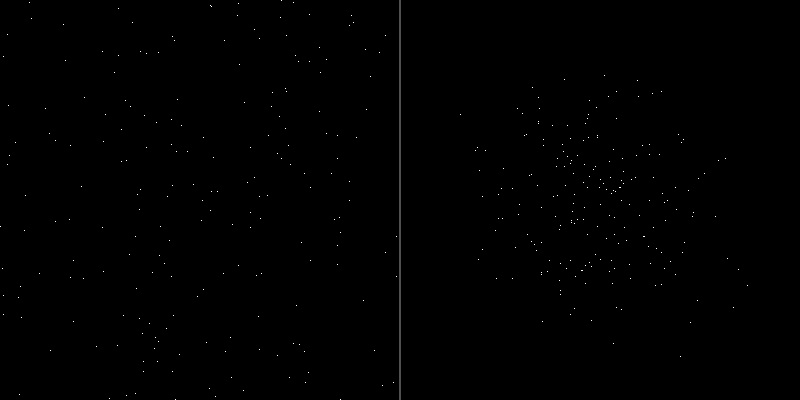
Left: Uniform distribution creates evenly scattered stars. Right: Gaussian distribution creates a cluster with density decreasing from the center.#
Did You Know?
Real star distributions in galaxies follow neither perfectly uniform nor simple Gaussian patterns. Astronomers use complex models like the Plummer profile and King models to describe stellar density in globular clusters. However, Gaussian distributions provide a good approximation for educational and artistic purposes [Binney2008].
Concept 3: Star Fields in Generative Art#
Star fields have been a staple of computer graphics since the earliest days of video games. The original Star Raiders (1979) and Elite (1984) used simple random point placement to create immersive space environments with minimal computational resources [Maher2012].
Modern generative artists use layered star fields to create depth:
Background layer: Many dim stars (low brightness values)
Midground layer: Fewer medium-brightness stars
Foreground layer: Few bright stars, possibly larger (multi-pixel)
This layering creates parallax effects when animated, enhancing the sense of three-dimensional space.
# Creating depth with varying brightness
brightness = np.random.randint(50, 256, size=NUM_STARS)
for x, y, b in zip(x_coords, y_coords, brightness):
    canvas[y, x] = b
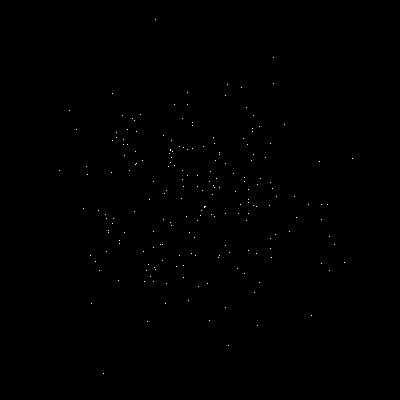
A star cluster using Gaussian distribution. Notice how star density decreases naturally from the center, mimicking real stellar clusters.#
Hands-On Exercises#
Exercise 1: Execute and Explore#
Run the simple_star.py script from the Quick Start section and observe
the output. Then answer these reflection questions:
Reflection Questions:
Why do we use
canvas[y_coords, x_coords]instead ofcanvas[x_coords, y_coords]?What happens if a coordinate exceeds the canvas size (e.g., 500 on a 400-pixel canvas)?
How would you create more stars? Fewer stars?
Answers
Y before X: NumPy uses row-major order where the first index is the row (vertical position, y) and the second is the column (horizontal position, x). This matches how 2D arrays are stored in memory but is opposite to mathematical (x, y) notation.
Out-of-bounds coordinates: NumPy will raise an
IndexErrorif any coordinate is outside the array bounds. Always usenp.clip()or ensure your random range matches the canvas size.Changing star count: Modify the
NUM_STARSparameter. For example,NUM_STARS = 500creates more stars,NUM_STARS = 50creates fewer.
Exercise 2: Modify to Achieve Goals#
Starting with the Quick Start code, complete these modification tasks:
Task A: Create a Gaussian star cluster
Modify the code to use Gaussian distribution instead of uniform distribution. Center the cluster at position (200, 200) with a spread of 60 pixels.
Hint
Replace np.random.randint() with np.random.normal():
x_coords = np.random.normal(200, 60, size=NUM_STARS)
y_coords = np.random.normal(200, 60, size=NUM_STARS)
Remember to clip and convert to integers afterward.
Solution
import numpy as np
from PIL import Image

CANVAS_SIZE = 400
NUM_STARS = 200
CENTER_X, CENTER_Y = 200, 200
SPREAD = 60

canvas = np.full((CANVAS_SIZE, CANVAS_SIZE), 0, dtype=np.uint8)

x_coords = np.random.normal(CENTER_X, SPREAD, size=NUM_STARS)
y_coords = np.random.normal(CENTER_Y, SPREAD, size=NUM_STARS)

x_coords = np.clip(x_coords, 0, CANVAS_SIZE - 1).astype(int)
y_coords = np.clip(y_coords, 0, CANVAS_SIZE - 1).astype(int)

canvas[y_coords, x_coords] = 255

Image.fromarray(canvas, mode='L').save('cluster.png')
Task B: Add a second cluster
After creating the first cluster, add a second cluster at position (100, 300) with 80 stars and a tighter spread of 30 pixels.
Hint
Generate a second set of coordinates and place them on the same canvas:
# Second cluster
x2 = np.random.normal(100, 30, size=80)
y2 = np.random.normal(300, 30, size=80)
x2 = np.clip(x2, 0, CANVAS_SIZE - 1).astype(int)
y2 = np.clip(y2, 0, CANVAS_SIZE - 1).astype(int)
canvas[y2, x2] = 255
Solution
import numpy as np
from PIL import Image

CANVAS_SIZE = 400
canvas = np.full((CANVAS_SIZE, CANVAS_SIZE), 0, dtype=np.uint8)

# Cluster 1: Large central cluster
x1 = np.random.normal(200, 60, size=200)
y1 = np.random.normal(200, 60, size=200)
x1 = np.clip(x1, 0, CANVAS_SIZE - 1).astype(int)
y1 = np.clip(y1, 0, CANVAS_SIZE - 1).astype(int)
canvas[y1, x1] = 255

# Cluster 2: Smaller tight cluster
x2 = np.random.normal(100, 30, size=80)
y2 = np.random.normal(300, 30, size=80)
x2 = np.clip(x2, 0, CANVAS_SIZE - 1).astype(int)
y2 = np.clip(y2, 0, CANVAS_SIZE - 1).astype(int)
canvas[y2, x2] = 255

Image.fromarray(canvas, mode='L').save('two_clusters.png')
Exercise 3: Create from Scratch - Multi-Cluster Galaxy#
Create a galaxy-like image with multiple star clusters. Each cluster should have different positions, sizes (number of stars), and spreads.
Requirements:
Canvas size: 512x512 pixels
At least 3 distinct star clusters
Vary the number of stars per cluster (50-300 stars)
Vary the spread per cluster (20-100 pixels)
Add sparse background stars across the entire canvas
Starter code:
import numpy as np
from PIL import Image

CANVAS_SIZE = 512
canvas = np.full((CANVAS_SIZE, CANVAS_SIZE), 0, dtype=np.uint8)


def add_cluster(canvas, center_x, center_y, num_stars, spread):
    """Add a star cluster to the canvas using Gaussian distribution."""
    # TODO: Generate Gaussian-distributed x coordinates
    x_coords = None  # Replace with your code

    # TODO: Generate Gaussian-distributed y coordinates
    y_coords = None  # Replace with your code

    # TODO: Clip coordinates to canvas bounds
    x_coords = None  # Replace with your code
    y_coords = None  # Replace with your code

    # TODO: Place stars on canvas
    pass  # Replace with your code


# TODO: Add at least 3 clusters with different parameters


Image.fromarray(canvas, mode='L').save('multi_cluster.png')
Hint 1: Implementing add_cluster
Use np.random.normal() for both x and y coordinates:
x_coords = np.random.normal(center_x, spread, size=num_stars)
y_coords = np.random.normal(center_y, spread, size=num_stars)
x_coords = np.clip(x_coords, 0, canvas.shape[1] - 1).astype(int)
y_coords = np.clip(y_coords, 0, canvas.shape[0] - 1).astype(int)
canvas[y_coords, x_coords] = 255
Hint 2: Adding background stars
Add a cluster with a very large spread to scatter stars across the canvas:
# Sparse background stars
add_cluster(canvas, 256, 256, num_stars=100, spread=200)
Complete Solution
 1import numpy as np
 2from PIL import Image
 3
 4CANVAS_SIZE = 512
 5canvas = np.full((CANVAS_SIZE, CANVAS_SIZE), 0, dtype=np.uint8)
 6
 7
 8def add_cluster(canvas, center_x, center_y, num_stars, spread):
 9    """Add a star cluster to the canvas using Gaussian distribution."""
10    x_coords = np.random.normal(center_x, spread, size=num_stars)
11    y_coords = np.random.normal(center_y, spread, size=num_stars)
12
13    x_coords = np.clip(x_coords, 0, canvas.shape[1] - 1).astype(int)
14    y_coords = np.clip(y_coords, 0, canvas.shape[0] - 1).astype(int)
15
16    canvas[y_coords, x_coords] = 255
17
18
19# Cluster 1: Large central cluster (main galaxy core)
20add_cluster(canvas, center_x=256, center_y=256, num_stars=300, spread=80)
21
22# Cluster 2: Smaller cluster to the upper-left
23add_cluster(canvas, center_x=100, center_y=120, num_stars=80, spread=30)
24
25# Cluster 3: Medium cluster to the lower-right
26add_cluster(canvas, center_x=400, center_y=380, num_stars=120, spread=45)
27
28# Cluster 4: Small tight cluster (globular cluster style)
29add_cluster(canvas, center_x=380, center_y=100, num_stars=60, spread=20)
30
31# Cluster 5: Sparse background stars
32add_cluster(canvas, center_x=256, center_y=256, num_stars=100, spread=200)
33
34Image.fromarray(canvas, mode='L').save('multi_cluster.png')
35print("Created multi-cluster galaxy!")
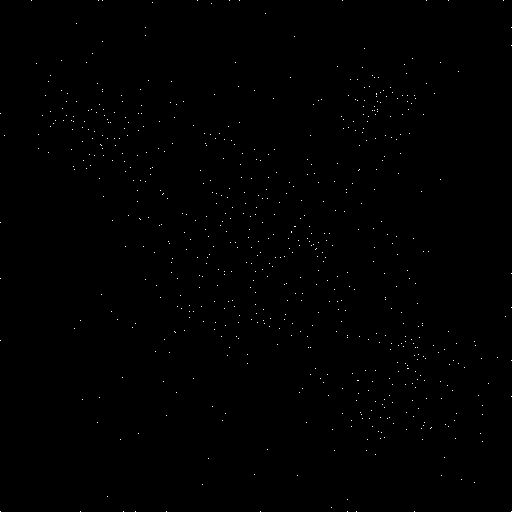
A galaxy-like pattern with multiple clusters of varying density. The central cluster is largest, with smaller satellite clusters and sparse background stars.#
Challenge Extension#
Ready for an advanced challenge? Try creating a star field with depth simulation:
Brightness Variation for Depth Effect
Create a star field where each star has a different brightness level, simulating distance. Brighter stars appear closer, dimmer stars appear farther away.
Requirements:
400 stars with random positions
Random brightness values from 50 (dim) to 255 (bright)
Add 10 “foreground” stars that are larger (3x3 pixel crosses)
Hint: Assigning individual brightness values
When each star has a unique brightness, you need to use a loop:
brightness = np.random.randint(50, 256, size=NUM_STARS)

for x, y, b in zip(x_coords, y_coords, brightness):
    canvas[y, x] = b
Hint: Creating larger foreground stars
Draw a small cross pattern for bright stars:
for x, y in zip(x_bright, y_bright):
    canvas[y, x] = 255      # Center
    canvas[y-1, x] = 200    # Top
    canvas[y+1, x] = 200    # Bottom
    canvas[y, x-1] = 200    # Left
    canvas[y, x+1] = 200    # Right
Brightness variation creates depth. Dim stars recede into the background while bright stars and cross-shaped foreground stars pop forward.#
Summary#
Key Takeaways:
Integer array indexing places pixels at specific coordinates:
canvas[y_coords, x_coords] = valuemodifies all specified positions at once.Row-column order: NumPy uses
[row, column]which is[y, x]in image coordinates. Always put y before x.Distribution matters: Uniform random creates scattered patterns; Gaussian creates natural-looking clusters with density falloff.
np.clip() prevents errors: Always clip coordinates to canvas bounds before indexing, especially with Gaussian distributions.
Layering creates depth: Multiple star layers with varying brightness and density simulate 3D space on a 2D canvas.
Common Pitfalls:
Warning
Wrong coordinate order: Writing
canvas[x, y]instead ofcanvas[y, x]will place stars in transposed positions.Forgetting to clip Gaussian coordinates:
np.random.normal()can return values outside the canvas bounds, causingIndexError.Integer conversion: Gaussian coordinates are floats. Forgetting
.astype(int)after clipping will cause a TypeError.Duplicate positions: If two stars land on the same pixel, only the last brightness value is kept. For dense fields, this is usually acceptable.
References#
Harris, C. R., et al. (2020). Array programming with NumPy. Nature, 585(7825), 357-362. https://doi.org/10.1038/s41586-020-2649-2 [Foundational paper on NumPy’s array operations and indexing mechanisms]
NumPy Developers. (2024). Random sampling (numpy.random). NumPy Reference. Retrieved January 30, 2025, from https://numpy.org/doc/stable/reference/random/index.html [Official documentation for NumPy’s random number generation functions]
Ross, S. M. (2014). Introduction to Probability and Statistics for Engineers and Scientists (5th ed.). Academic Press. ISBN: 978-0-12-394811-3 [Standard reference on probability distributions including Gaussian/normal]
Binney, J., & Tremaine, S. (2008). Galactic Dynamics (2nd ed.). Princeton University Press. ISBN: 978-0-691-13026-2 [Advanced reference on stellar distributions in galaxies and star clusters]
Maher, J. (2012). The Future Was Here: The Commodore Amiga. MIT Press. ISBN: 978-0-262-01720-6 [Historical context on early computer graphics including star field rendering]
Pearson, M. (2011). Generative Art: A Practical Guide Using Processing. Manning Publications. ISBN: 978-1-935182-62-5 [Practical introduction to generative art techniques including particle systems]
Clark, A., et al. (2024). Pillow (PIL Fork) Documentation. Retrieved January 30, 2025, from https://pillow.readthedocs.io/ [Official documentation for Python Imaging Library used for image saving]